What are Terraform Workspaces
- Jan 9, 2025
- 2 min read
Updated: Jan 10, 2025

Terraform workspaces provide isolated states for each enivronment allowing you to manage multiple environments (dev, staging, prod) within a single configuration file
Each workspace has its own state, meaning resources created in one workspace are not affected by changes in another.
By default, Terraform starts in the default workspace, which is where resources are managed unless additional workspaces are created.
Why Use Workspaces?
Environment Seperation: They allow for separation of resources for different environments without needing multiple configurations or directories
Resource Management: Isolated states help in managing resources specific to each environment without interference
When to Use Workspaces vs. Separate Configurations
Workspaces are beneficial for cases when environments are very similar and minor adjustments (e.g., Instance Size, Region) Differentiate them
Separate Configurations might be more appropriate for environments with significantly different resource structures, security requirements, or infrastructure needs.
Setting Up and Using Workspaces
Step1: Initialize Terraform: Before working with workspaces, ensure Terraform is initialized for your configuration.
terraform initStep2: List existing Workspaces
terraform workspace list
Step3: Create a New Workspace
terraform workspace new dev
Step4: Switch Between Workspaces
terraform workspace select devStep5: Identify the Current Workspace
terraform workspace showStep6: Apply Configuration in Workspace Dev
terraform apply
Managing Workspaces and Environment-Specific Customization
Customizing Resources per Environment: To customize your Terraform configurations for different environments, you can use variables, backend configurations, and conditional logic.
Method1: Using Variables for Environment-Specific Configuration
Step1) Directory Setup
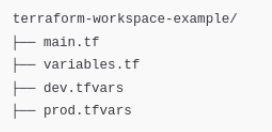
Step2) Define Resources in main.tf
Write a simple Terraform configuration for deploying an AWS EC2 instance. Use terraform.workspace to customize the instance type dynamically based on the active workspace.
provider "aws" {
  region = var.region
}

resource "aws_instance" "example" {
  ami           = "ami-0c02fb55956c7d316" # Amazon Linux 2 AMI ID
  instance_type = var.instance_type
  tags = {
    Name = "${terraform.workspace}-instance"
  }
}
Step3) Define Variables in variables.tf
variable "instance_type" {
    description = "Instance type of the Environment"
}

variable "region" {
    description = "AWS Region for the Environment"
}
Step4) Environment Specific Variables
#dev.tfvars
instance_type = "t2.micro"
region = "us-east-1"

#prod.tfvars
instance_type = "t3.medium"
region = "us-west-2"
Step5) Initialize And Create Workspace
terraform init

terraform workspace new dev
terraform workspace new prod

terrafrom workspace list
Step6) Plan and Apply for each workspace
terraform workspace select dev
terraform plan -var-file="dev.tfvars"
terraform apply -var-file="dev.tfvars"
terraform workspace select prod
terraform plan -var-file="prod.tfvars"
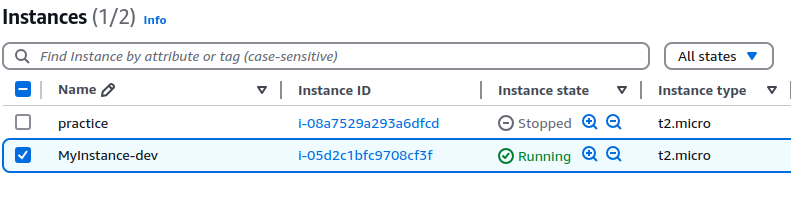
terraform apply -var-file="dev.tfvars"An EC2 Instance will be created in us-east-1 with type t2.micro
An EC2 Instance will be created in us-west-2 with type t3.medium

Comments